Content Editor
Visual components made available to users in the Content Editor.
Context Menu
The Context Menu integration reveals a list of options to the user in the context menu under a special node called Scripts. The Sitecore rules engine may be used to control visibility and enabled state. The script is only executed when the option is clicked.
Begin by adding a new script to the Context Menu library. The name of the script will appear in the context menu.
Edit the script to perform the appropriate actions. The script can run in the background and show dialogs.
Change the icon of the item to match the script purpose.
Configure any Enable or Show rules as needed.
Note: Examples included in the following modules
Authoring Instrumentation
Copy Renderings
Index On Demand
Media Library Maintenance
Package Generator

Package Generator Task Management
See how Adam added context menu PowerShell scripts.
Gutter
The Gutter integration reveals a visual notification to the user in the far left gutter. The Sitecore rules engine may be used to control enabled state.
Begin by adding a new script to the Gutters library.
Edit the script to create a new instance of
Sitecore.Shell.Applications.ContentEditor.Gutters.GutterIconDescriptorif the right conditions are met.Set the Icon, Tooltip, and Click properties.
Return the gutter object
Configure any Enable rules to ensure the script runs only when necessary.
Rebuild the gutter integration from within the ISE.
Settings tab
Integration chunk
Sync Library with Content Editor Gutter command
Note: Examples included in the following modules
Publishing Status Gutter

Publishing Status
Insert Item
The Insert Item integration reveals a list of options to the user in the context menu under the node called Insert. The Sitecore rules engine may be used to control visibility and enabled state. The script is only executed when the option is clicked.
Begin by adding a new script to the Insert Item library. The name of the script will appear in the context menu.
Edit the script to perform the appropriate actions. The script can run in the background and show dialogs.
Change the icon of the item to match the script purpose.
Configure any Show rules as needed.
Note: Examples included in the following modules
Task Management

Insert Scheduled Task Platform
Ribbon
The Ribbon integration reveals commands to the user in the ribbon. The Sitecore rules engine may be used to control visibility and enabled state. The script is only executed when the option is clicked.
Begin by adding a new child script library to the Ribbon library; we'll refer to this library as the Tab library. Choose a name that matches an existing tab to be used, such as Home or Developer, or a new name to create a new tab.
Add a child script library to the Tab library; we'll call this the Chunk library. Choose a name such as Edit or Tools.
Add a new script to the Chunk script library; we'll refer to this library as the Command library. The name of the script will appear in the ribbon chunk as a command.
Optionally add a short description on the item, which is found as a standard field on the item. The description will appear as a tooltip on the ribbon button.
Edit the script to perform the appropriate actions. The script can run in the background and show dialogs.
Change the icon of the item to match the script purpose.
Configure any Enable or Show rules as needed.

Example: The following script gets the selected Context Menu item and displays an alert using the item name.
Button Size:
There is a way to generate small buttons and combo buttons. You simply need to prefix the script name and SPE will generate accordingly.
Small$[SCRIPT_NAME]Combo$[SCRIPT_NAME]SmallCombo$[SCRIPT_NAME]


See the birth of extending the Sitecore ribbon with powershell scripts by Adam.
Check out an example of the 5 steps to extending the Sitecore ribbon in the wild by Toby.
Contextual Ribbon
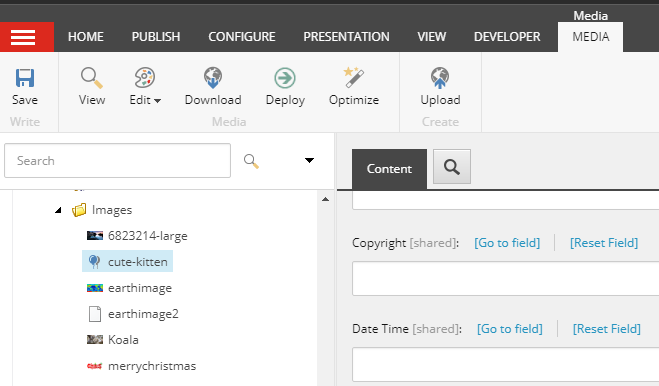
Similar to the Ribbon integration, this provides a way to show buttons when certain contextual conditions are met. Most common is with media items. The steps are the same as with the standard Ribbon, but the structure is slightly changed.
In the following example, we have a ribbon button that appears whenever the selected item in the Content Editor is a media item. Take note of the "Optimize" button.

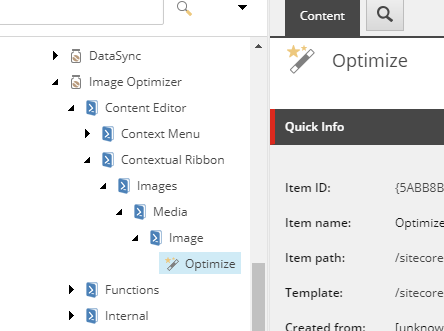
The ribbon structure would look like the following:

Warning
The Warning integration reveals a notification to the user above content. The Sitecore rules engine can be used to control visibility and enabled state. The scripts are only executed when the rule is met and the command is clicked.
Begin by adding a new script library to the Warning library.
Edit the script to perform the appropriate actions. The script can run in the background and show dialogs.
The warning notification title, text and icon should be configured in the script.
Include options to the warning by adding one or more secondary scripts to the script library.
Configure any Enable rules to ensure the script only runs when required.
Note: Examples included in the following modules
License Expiration - disabled by default

Alan provided a nice example here on setting up the warning with commands.
Last updated